This is my journey about updating an Umbraco 7 website to the latest version of Umbraco - which is Umbraco 13 as of today. The following content will be a detailed look into the process.
Due to database changes and Umbraco schema changes from Umbraco 7 to the current versions you cannot just do an in place upgrade of Umbraco. In order to get to the latest version of Umbraco you have to do incremental updates and migrations.
The first step is a content migration from database to database and then manually update whatever content didn't come over. Once the content is in a good place, update the back end code and views to be compatible with the newest version of Umbraco and .Net.
In this post I will walk through the steps I took to migrate/update my Umbraco 7 instance to Umbraco 13 while documenting errors, pitfalls, what worked and what didn't work along the way.
Let's begin.
uSync of upgrade
I use uSync to migrate the content. There are a couple hoops you have to jump through in order to get this working properly. Luckily for me the fine folks at Jumoo have written a good step by step guide for this process, you can also follow the guide that is detailed here in the Jumoo Github repository.
First install uSync into the source Umbraco 7.15.10 site. In order to follow these steps the site needs to be at least Umbraco 7.15.10. This is going to allow me to do an export of all my data which will be imported into the current Umbraco instance.
- Upgrade your website to at least Umbraco 7.15.10
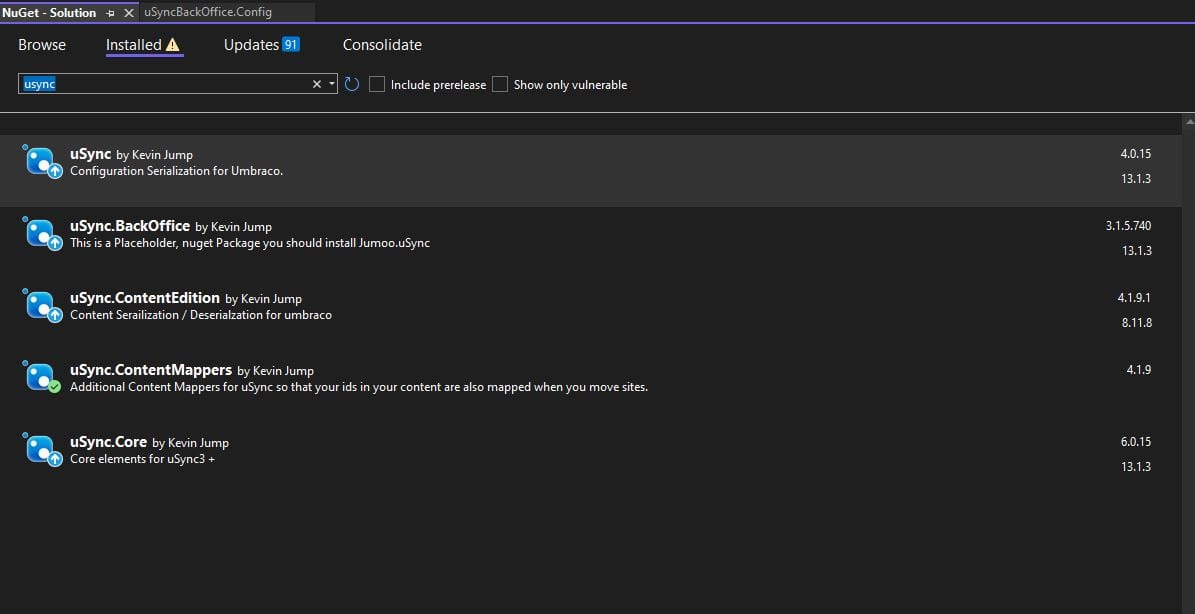
- Install uSync and supporting packages in your Umbraco 7 project. I used NuGet to install these versions. Make sure you install the versions that are compatible with your Umbraco version.
- Install uSync Nuget packages:
- uSync - 4.015
- uSync.BackOffice - 3.1.5.740
- uSync.ContentEdition - 4.1.9.1
- uSync.ContentMappers - 4.1.9
- uSync.Core - 6.0.15
- Download
uSync.Migrations.Packer v7package from GitHub and install it in your Umbraco 7.15 instance. This is a uSync package that will help prepare your 7.15 content to be exported in a format that can be imported into the latest version of Umbraco. - After you download the package, navigate to the Umbraco back office --> Developer --> Packages --> Install local and add the package zip file.
- After that package is installed, navigate back to the Developer landing page and select the
uSync BackOfficetab. The URL for this tab is/umbraco/#/developer- I mention this because I could not find that tab after I installed the package. The older version of Umbraco was new to me as I'm familiar with the modern version of Umbraco, so it took me a little while to figure out how to get to this tab. - Update the uSync.BackOffice.config file. Set the following parameters:
DontThrowErrors= trueUseShortIdNames= true
- Go back to the website. Click the Migrations tab and make pack button.
- If you don't see the uSync BackOffice tab you, manually add it to the
Config\Dashboard.configfile by pasting this code to the end of the file:
 <section alias="usyncBackOffice">
    <areas>
      <area>developer</area>
    </areas>
    <tab caption="uSync BackOffice">
      <control>/App_Plugins/usync/uSyncDashboard.html</control>
    </tab>
  </section>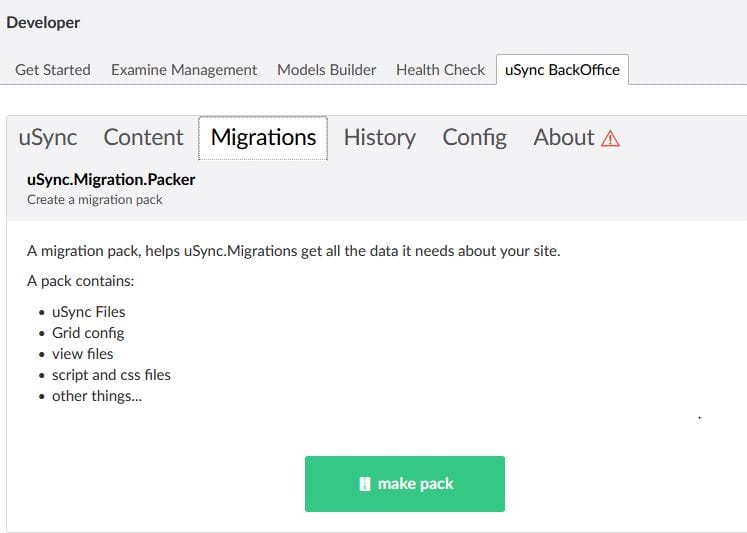
- Now uSync will do it's thing and eventually create a .zip folder containing your Umbraco 7 content. Download and save the .zip file to a location you can get to from your new Umbraco installation.
Install a fresh Umbraco 12 site
Now that the data is exported from Umbraco 7, we need to create your fresh new Umbraco 12 site.
This post is about migrating to Umbraco 13, however the code below uses a package called uSync Migrations and uSync Migrations does not support Umbraco 13 at the time of this post. So, we will need to migrate to Umbraco 12 and then upgrade to Umbraco 13 after the migration is complete.
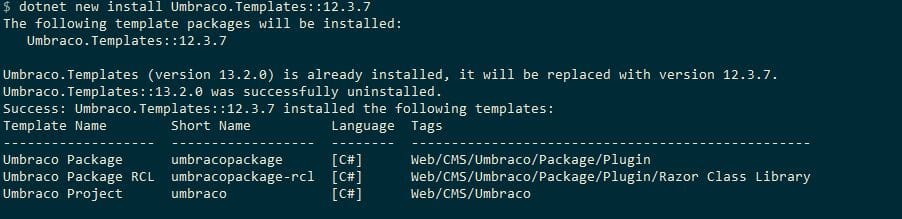
- Start by installing the Umbraco 12 templates for dotnet. Installing these templates will overwrite any Umbraco templates you already have created on your machine. So if you have 13 templates installed, you will need to reinstall them after this migration is complete.
- Then run the following command from a command prompt:
dotnet new install Umbraco.Templates::12.3.7
Start by installing the Umbraco Templates for version 12
- You now should have the Umbraco 12 templates installed on your machine. As you can see my Umbraco 13 templates were uninstalled before the version 12 templates were installed.
- Next create a new Umbraco 12 project:
dotnet new umbraco -n MyUmbraco
dotnet build
dotnet run- You will now be able to configure your new Umbraco 12 project and website. This is going to be your new Umbraco 13 project solution and website. So go through the steps to configure the database and Umbraco website to match what you want the final Umbraco 13 site to be. Eventually this site will get upgraded to Umbraco 13.
- Once the site is configured, install these uSync packages for Umbraco 12.
dotnet add package uSync --version 12.2.3
dotnet add package uSync.Migrations --version 4.0.0-phase.5.1
Install Umbraco 12 packages
Migrate
After the new Umbraco 12 website is configured with uSync and uSync Migrations you are ready to do the migration. Again the Jumoo team does a fantastic job of documenting the necessary steps for a migration, so instead of copying what they've arleady written follow the steps provided by the Jumoo team on the uSyncMigrations repo page.
Once the migrations are all completed, you should have a content tree populated with the content from the Umbraco 7 site as well as all the other content from your Umbraco 7 site in your Umbraco 12 site.
Upgrade to Umbraco 13
The next step is to upgrade from Umbraco 12 to Umbraco 13 which should be pretty easy and straight forward. To do the upgrade to Umbraco 13 just follow these instructions to upgrade to Umbraco 13.
Update code and view files
That's all there is to getting the content from Umbraco 7 into your new Umbraco 13 project. The next step is to update all the custom code behind and views from your Umbraco 7 project.
There are a lot of steps to go through in order to complete this upgrade. I started by copying over a simple content template and then configuring the Document Type to that new template.